Sequence
Sequences of commands forms one of the first principles of computer programming to instill into young programmers. Turtle graphics was invented forty years ago to allow children to move a turtle around the screen drawing a line to make shapes and patterns. Scratch has a series of programming blocks known as motions used to control the movement of the sprite around the stage and a series of pen commands to control the appearance of the line drawn. These correspond broadly to the commands traditionally available for turtle graphics and are a perfect introduction to computer programming.
The onekey application is a good start for young programmers to appreciate the use of sequences of forward and right movements to build shapes including squares, triangles, hexagons, and stars. Children from the age of three onwards can use the onekey application to draw shapes. Young programmers from the age of six can use the Scratch design environment to create their own onekey program.
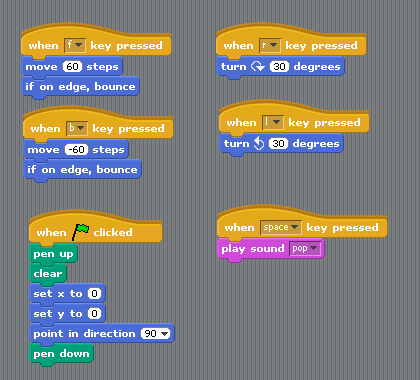
Building the onekey application is one way to start children working with the Scratch environment and seems to work with children as young as six years old. Open the scratch design environment and investigate the motions programming blocks. Double clicking on the move and turn blocks will move the sprite around the stage. Drag the blocks out onto the scripts area and join together to make a sequence of commands to draw a square for example. Younger programmers can change the distance of the move command but take care not to elaborate on the nature of an angle with children under eight (perhaps always use turn 30 into your applications).
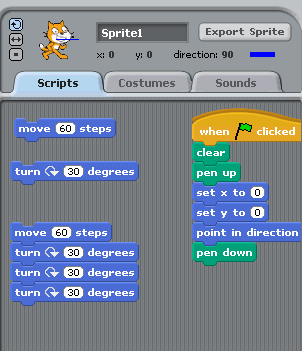
Make sure the pen is down by dragging the pen down block from the pens blocks into the scripts section of the design environment and double clicking on it. The sprite will now leave a trail. Explore sequences of the move and turn commands and encourage the programmers to create sequences of commands to draw a square, triangle, or hexagon by copying and putting combinations of move 60 and turn 30 commands.
In the onekey application move 60 corresponds to the forward command and turn 30 to the right command. There is plenty of scope to draw square, triangles, and hexagons by double clicking on the relevant control block. Right click on the items to copy them and fit them together to execute a sequence of commands. Copy a collection of sequences to create the required shapes.
Introduce the when key pressed command block from the controls section by dragging the appropriate hat control onto the scripts area, changing the key to F (or up arrow) and connecting to the move 60 command. Pressing the F key will now move the sprite forwards. Repeat the process for the R (or right arrow) key to turn 30 and you can now control the sprite moving around the stage. You may also like to add the bounce block to the move command.
The basics of the onekey application is now complete. The pen down command is required for the sprite to leave a trail and is best attached to the green flag control which should be used to start an application. Round off the application with a move -60 command for the Back command attached to the B key (or down arrow) and a turn -30 for the Left command attached to the L key (or left arrow).
The final stage to complete this application allows the young programmer some creativity. The costume for the sprite can be selected from a range of artwork by selecting the costumes tab and importing a new costume. The sounds tab can be used to import or make a recording with a microphone. Name the sound and create a control for when the space key is pressed and attach a play sound from the sounds programming blocks. Use the pop down selection (click on the arrow) to select the required sound.
The application is now complete and can be saved to disk. Select the notes button to provide a brief description for the application user and save to the disk. The project can also be shared between classmates.
Our best teaching practice is to build the application yourself either with the programmers watching or with the whole class with an interactive whiteboard and then start a new project so the student can create their own project from scratch. A completed onekey project is available for reference.